






Imagine regularly downloading new releases of protein databases (PDB, UniProt, AFDB, ESMAtlas, etc.) and having to process them efficiently while avoiding redundant computations. It's a surprisingly frustrating problem.
FRIdata (free data) is a protein data generation and storage workflow that produces non-redundant protein derivatives, e.g.:
- 3D coordinates and distograms
- Sequences and protein language model embeddings (ESM-2, ESM-C, gLM-2, etc.)
- HTML reports showing data dependencies Leveraging Dask, it is highly efficient and scalable
In deepFRI2 training, we use FRIdata to manage different releases of the Gene Ontology Annotation (GOA) database, stratified by annotation quality.
Full documentation may be found here.
The repository is currently under active development. If you run into installation problems, find a bug, or would like to propose an improvement, please raise an issue or write directly to p.szczerbiak[at]sanoscience.org.
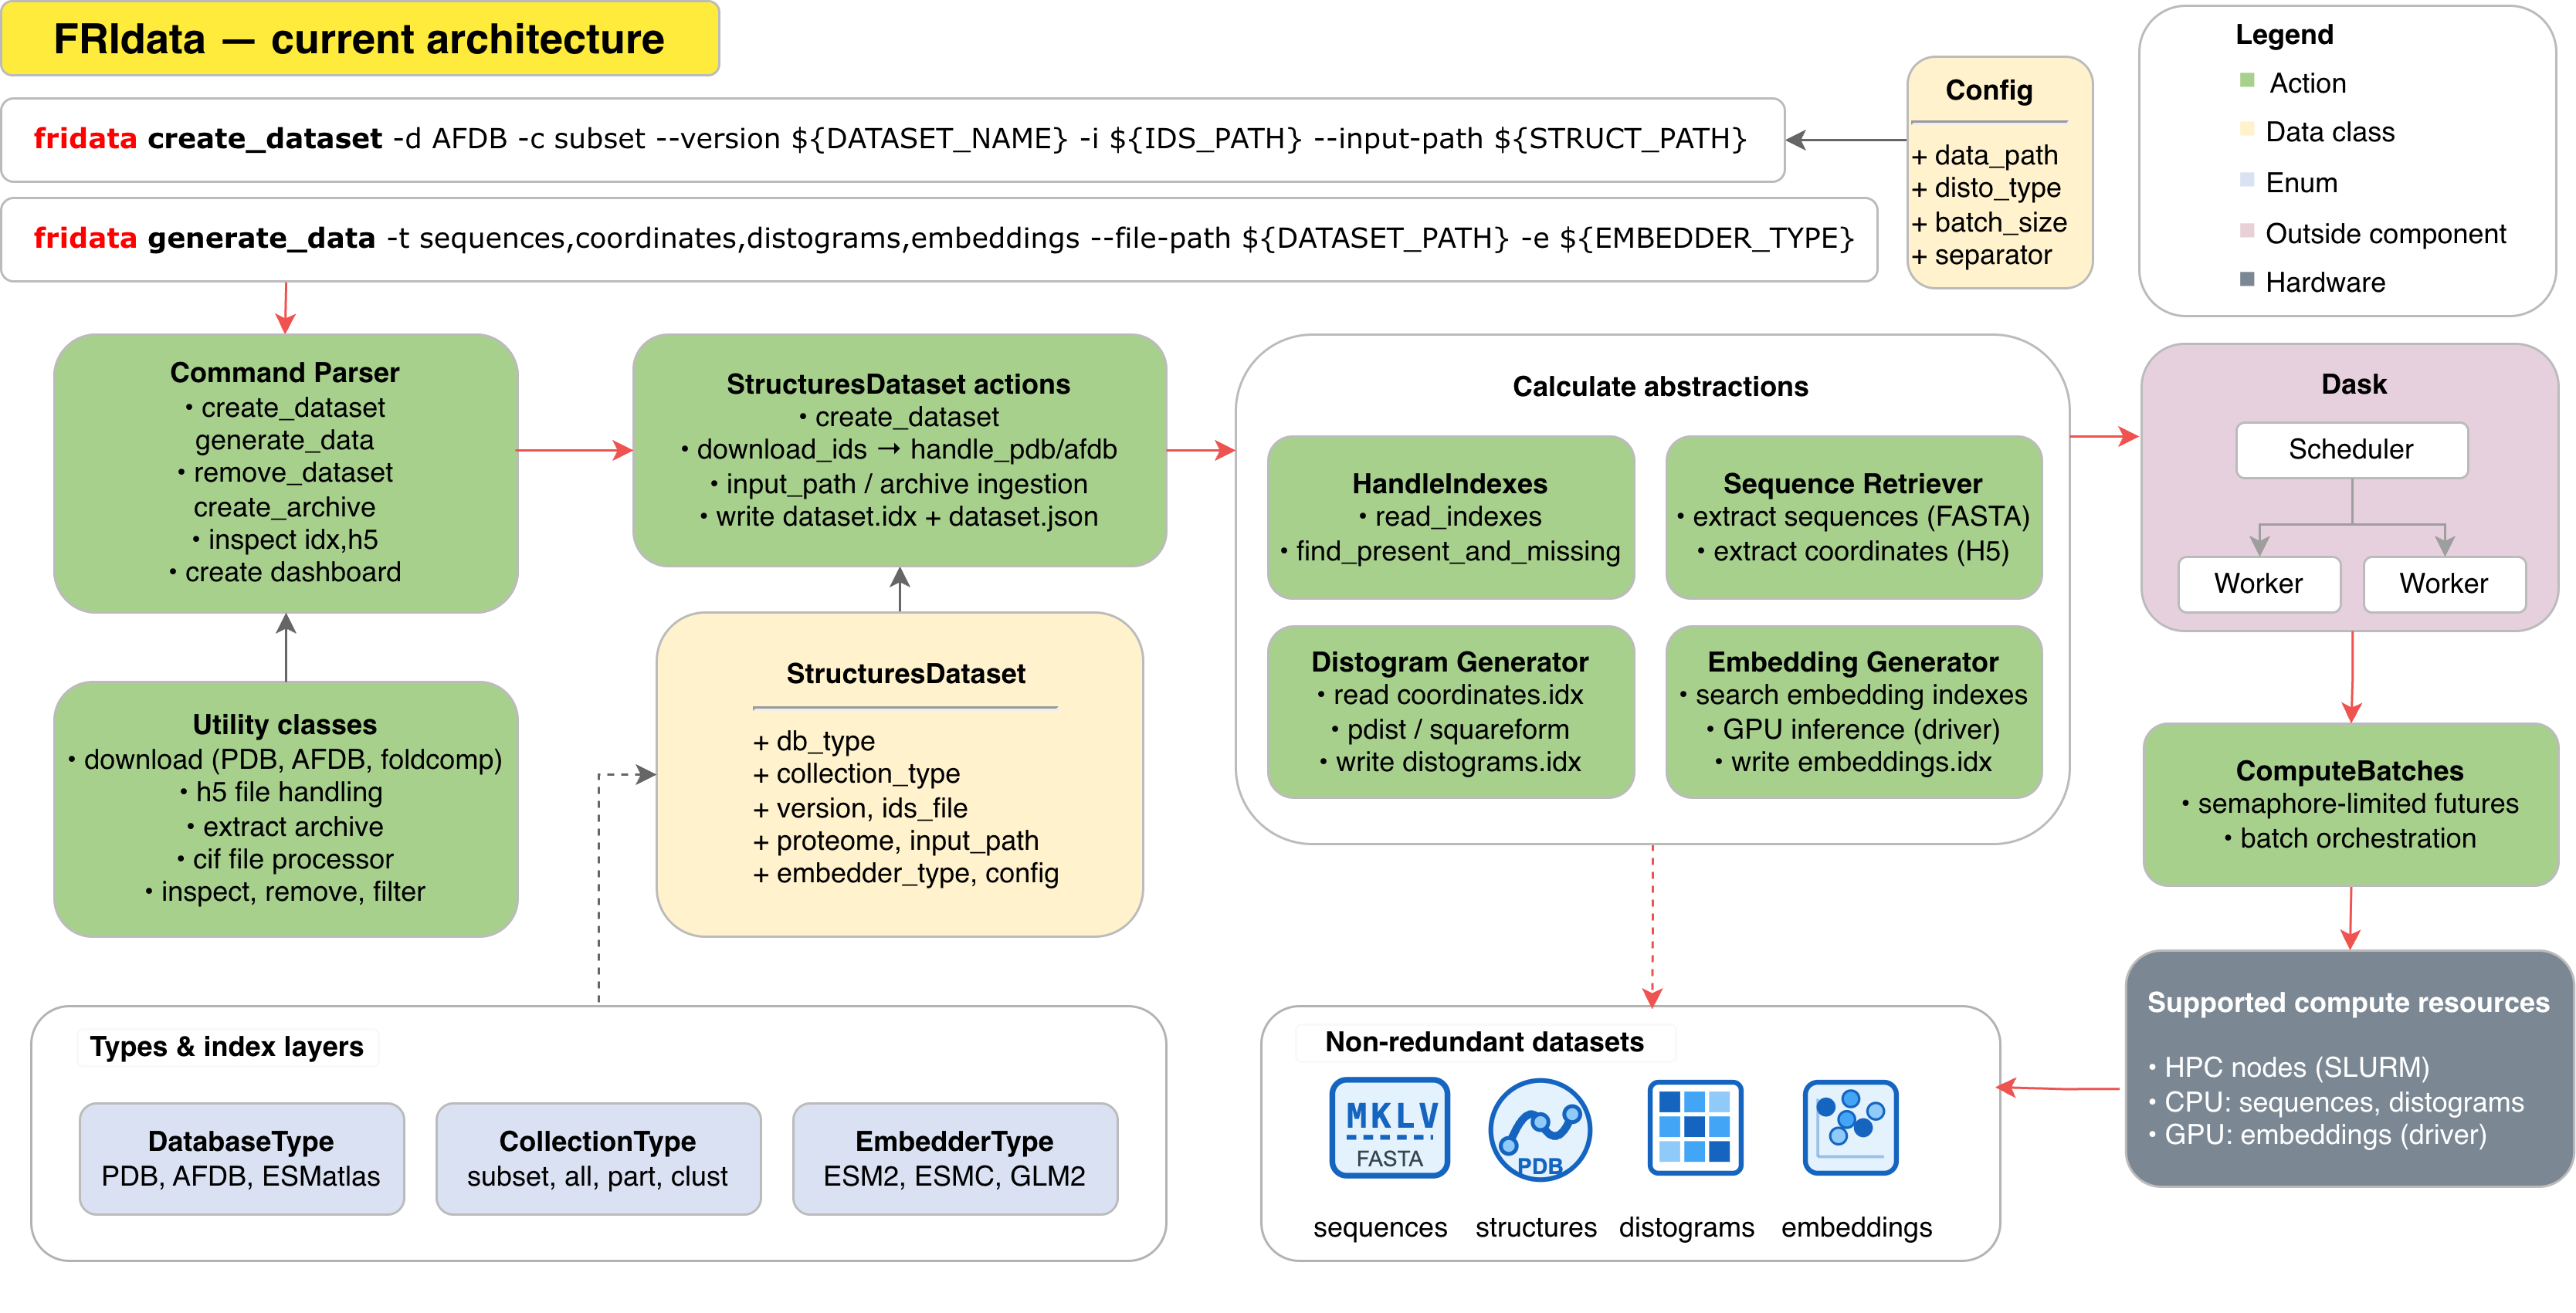
Generate sequences, coordinates, distograms, and embeddings from protein structures at scale. Supports PDB, AFDB, ESMatlas, and local/custom inputs. Full API reference: docs/index.html.
Every dataset is defined by a database type (-d, --db) and a collection type (-c, --collection), plus optional --proteome and --version. Together they determine the dataset name (for example AFDB-subset--test) and how structures are resolved.
Use -t / --type to choose what to generate in a run: sequences, coordinates, distograms, embeddings, or all.
Where structures come from.
| Value | Meaning |
|---|---|
PDB |
RCSB PDB structures (download by ID) |
AFDB |
AlphaFold Database |
ESMatlas |
ESM Atlas |
other |
Local or custom files via --input-path or archives |
How much of that source to include.
| Value | Meaning |
|---|---|
all |
Full database collection |
part |
AFDB proteome partition (requires --proteome; foldcomp-based) |
clust |
AFDB cluster partition (requires --proteome; foldcomp-based) |
subset |
User-defined ID list via -i / --ids (optionally --input-path for local structures) |
FRIdata is a pure-pip project (Python >= 3.10). No conda/mamba required.
The core install covers sequences, coordinates and distograms. Embedding
generation needs the heavier torch/esm/transformers stack, which lives in
an optional embeddings extra so the default install stays small.
The setup script creates a virtualenv, installs FRIdata with its dev extras, and installs a PyTorch build matched to your GPU driver:
git clone https://github.com/Tomasz-Lab/FRIdata.git
cd FRIdata
./scripts/setup_env.sh            # GPU (auto-detected); use --cpu for CPU-only
source .venv/bin/activate
Options: --cpu (CPU-only PyTorch), --skip-pytorch (core install, no
embeddings), -p/--path DIR (virtualenv location, default .venv).
python -m venv .venv
source .venv/bin/activate
python -m pip install --upgrade pip

# Core only (sequences / coordinates / distograms):
pip install -e .

# ...or with embedding support (torch/esm/transformers from PyPI):
pip install -e ".[embeddings]"
On Linux the default PyPI torch wheel is CUDA-enabled. For a specific CUDA
version or CPU-only wheels, use the helper after installing:
./scripts/install_pytorch.sh          # auto-detect CUDA from the driver
./scripts/install_pytorch.sh --cpu    # force CPU-only build
Once released, FRIdata can be installed without cloning the repo:
pip install fridata                 # core
pip install "fridata[embeddings]"   # with embedding support
pytest ./tests
Requires having a directory with AFDB structures and a text file containing list of AFDB IDs with \n delimeter. Assuming all steps from Installation succeeded
FRIDATA_PATH="<repository path>"
AFDB_PATH="<AFDB structures directory path>"
IDS_PATH="<AFDB IDs file path>"

cd ${FRIDATA_PATH}

EMBEDDER_TYPE=esm2_t33_650M_UR50D

# (MACOS only) Fix for OpenMP multiple runtime error
export KMP_DUPLICATE_LIB_OK=TRUE

PYTHONPATH='.' python3 -u ${FRIDATA_PATH}/fridata.py \
 generate_data \
 -t sequences,coordinates,distograms,embeddings \
 -d AFDB \
 -c subset \
 --version test  \
 -i ${IDS_PATH} \
 --input-path ${AFDB_PATH} \
 -e ${EMBEDDER_TYPE}
For subset runs with --input-path, new datasets store canonical keys as {line_from_ids_file}_{chain} (for example A0A2K6V5L6_A), not the full AlphaFold CIF filename stem. The dataset’s input_structures.idx maps each canonical key to the source structure filename. Older datasets created before this convention may still use long AF-style keys.
Assuming all Installation steps succeeded.
- Go into
FRIdatadirectory
cd <path into FRIdata>
- Install as a CLI tool
python3 -m pip install -e .
- Now FRIdata can be run as a CLI tool
fridata <...>
(Use ids_file tokens (e.g. plain UniProt) plus chain as the canonical dataset index keys)
Running FRIdata on HPC differs on CPU and GPU nodes. This instruction set is valid for HPC hosted in PLGrid infrastructure. Running on other infrastructures may require additional adjustments.
Prerequisites:
- Having active grant valid on the HPC
- Having a full list of mandatory ENV vars set (ideally in .bashrc):
DEEPFRI_PATH: should always refer to a parent directory of this repoIDS_PATH: path to a text file with AFDB indexes listedAFDB_PATH: path to AFDB structures (can be empty directory - structures will be fetched there)DATA_PATH: path to the parent diretory of all generated output data- Optional ENV vars with default values:
COMMON_SLURM_PATH: path to common_slurm.sh, defaults to$DEEPFRI_PATH/FRIdata/scripts/hpc/common_slurm.shLAUNCH_WORKER_SLURM_PATH: path to launch_worker_slurm.sh, defaults to$DEEPFRI_PATH/FRIdata/scripts/hpc/launch_workers_slurm.shMEMORY_LIMIT: memory limit per Dask worker, defaults to288GiBIP_INTERFACE: network unix interface, where dask workers are connected. Defaults toens1f0VENV_PATH: path to the FRIdata virtualenv, defaults to$DEEPFRI_PATH/.venv
- Have a Python module available (
module avail python— the scripts trypython/python3; adjust the candidate list inscripts/hpc/*.shif your cluster names it differently) - Have installed module gcc
Steps:
- Download the repo
git clone https://github.com/Tomasz-Lab/FRIdata.git
cd FRIdata
- Update run permissions
chmod u+x -R scripts/hpc/cpu
- Run
initialize_slurm.shto create the virtualenv (atVENV_PATH, default$DEEPFRI_PATH/.venv) and install dependencies. Add the--cpuflag on CPU clusters.
./scripts/hpc/initialize_slurm.sh [--cpu]
- Schedule sbatch script into the HPC with all the args specified. Operations to be chosen are:
sequences,coordinates,embeddings
For CPU:
sbatch --cpus-per-task=<cpus> --time=<HH:MM:SS> --nodes=<nodes> --account=<grant name> scripts/hpc/run_slurm.sh sequences,coordinates
For GPU:
sbatch --gres=gpu[:gpu-number] --time=<HH:MM:SS> --account=<grant name> --nodes=1 --partition=<partition name> --cpus-per-task=<cpus> scripts/hpc/run_slurm.sh embeddings