Getting Started with JSNativeUI
In order to use this library you need MoSync SDK 2.7+, which has support for Wormhole technology. Follow the instructions on how to install it on your respective platform. For the rest of this document we assume that you know how to use MoSync (if not please refer to MoSync Documentation).
You can download the project from its github page in the form of a zip file or if you want to keep your copy updated clone the repository using the following command:
git clone git://github.com/MoSyncLabs/JSNativeUI.git
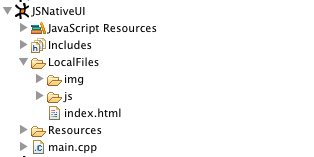
Import the project into your MoSync workspace, take a look at the file structure. The project has a sub-folder named LocalFiles which will include all of your HTML, JavaScript and CSS files and also resource file that you will use from JavaScript/HTML.
There is also some C++ files in the project folder that in most cases you do not need to touch, unless you want to extend the system or override the low level functionality.
In order to run the project you need to have access to either Android emulator or iPhone Simulator. MoSync 2.7 has built in support for directly running your app on either of those tools (if you don’t knwo how to use this feature please refer to MoSync documentation). You can also run your project on a device if you have access to one. We are going to use the Android emulator for next steps of this guide but running the app on other platforms is very similar (for more information please refer to MoSync Documentation).
Select Android 2.x profile from the profile database in your MoSync IDE, and then press run and select Android Emulator as the target.
Here is what you should see on your screen.


First let’s have a quick overview of the index file’s structure. All of the Native widgets are div tags wrapped inside a main div tag with id “NativeUI”. Then there is a TabScreen screen widget which wraps everything else. When initiated the system loads the tag “mainScreen” to the actual screen of the phone. There are Several widget placed inside this main screen in a specific layout (to figure out what each of them mean refer to the Widget Types documentation). Note: Every NativeUI tag should contain an "id" attribute or it will be ignored.
<body  onload="NativeUI.initUI()">
 <div id="NativeUI">
  <div widgetType="TabScreen" id="mainScreen">
   <div widgetType="Screen" id="firstScreen" title="Web Screen" icon="img/TabIconWebView.png">
    <div widgetType="WebView" id="WebBrowser" with="-1" height="-1" url="http://www.google.com"></div>
   </div>
   <div widgetType="Screen" id="SecondScreen" title="Widget Screen" icon="img/TabIconImageSwiper.png">
    <div widgetType="VerticalLayout" id="mainLayout" width="-1" height="-1">
     <div widgetType="Label" id="myLabel" width="-1" text="Here is a Label" fontSize="14" fontColor="0xEE3B3B"></div>
     <div widgetType="Button" id="myButton" width="-1" text="Click !" onevent="handleButtonEvent()"></div>
    </div>
   </div>
  </div>
 </div>
</body>
Now let’s add another Tab to our application. Insert the following code just before the closing tag of the TabScreen(mainScreen):
<div widgetType="Screen" id="ThirdScreen" title="New Screen" icon="img/TabIconWebView.png">
 <div widgetType="EditBox" id="myEditBox" with="-1" height="-2" text="This an example of EditBox"></div>
</div>
Your HTML markup should look like this now:
<body  onload="NativeUI.initUI()">
 <div id="NativeUI">
  <div widgetType="TabScreen" id="mainScreen">
   <div widgetType="Screen" id="firstScreen" title="Web Screen" icon="img/TabIconWebView.png">
    <div widgetType="WebView" id="WebBrowser" with="-1" height="-1" url="http://www.google.com"></div>
   </div>
   <div widgetType="Screen" id="SecondScreen" title="Widget Screen" icon="img/TabIconImageSwiper.png">
    <div widgetType="VerticalLayout" id="mainLayout" width="-1" height="-1">
     <div widgetType="Label" id="myLabel" width="-1" text="Here is a Label" fontSize="14" fontColor="0xEE3B3B"></div>
	 <div widgetType="Button" id="myButton" width="-1" text="Click !" onevent="handleButtonEvent()"></div>
    </div>
   </div>
   <div widgetType="Screen" id="ThirdScreen" title="New Screen" icon="img/TabIconWebView.png">
    <div widgetType="EditBox" id="myEditBox" with="-1" height="-2" text="This an example of EditBox"></div>
   </div>
  </div>
 </div>
</body>
Now try running your app again and you can see the following screen.
