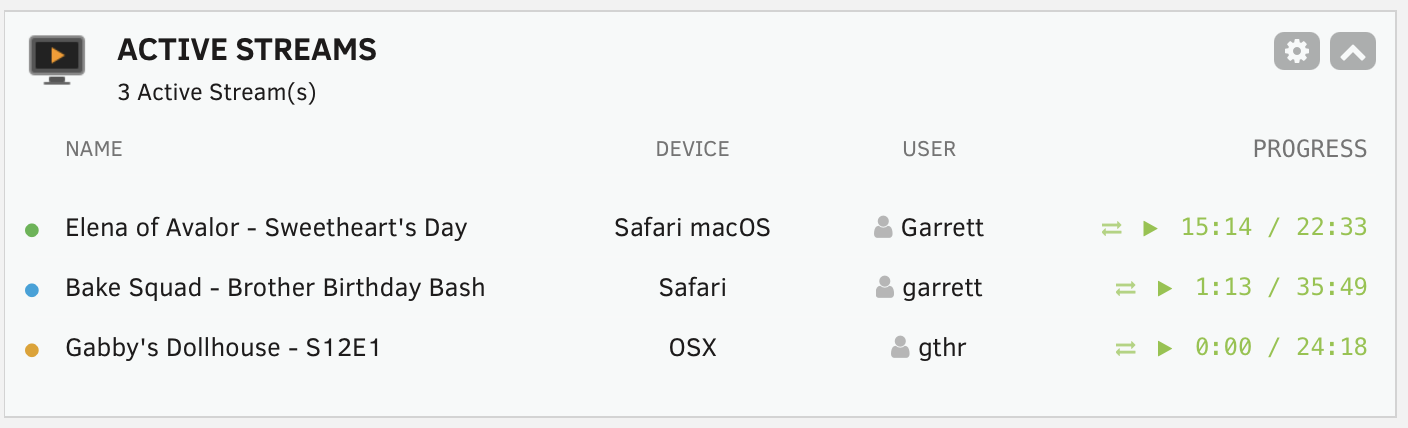
Active Streams is a lightweight Unraid plugin that adds a real-time dashboard widget to monitor active media streams from Plex, Emby, and Jellyfin servers directly from your Unraid WebGUI.
Support my work on PayPal.me
This project is an unofficial community plugin and is not affiliated with, endorsed by, or associated with Plex®, Emby®, or Jellyfin®.
"Plex" is a trademark of Plex, Inc. "Emby" is a trademark of Emby Media Inc. "Jellyfin" is a trademark of the Jellyfin Contributors. All rights reserved.
- Multi-Server Support: Monitor streams from Plex, Emby, and Jellyfin servers—all in one widget
- Multiple Instances: Configure as many server instances as you need
- Dashboard Widget: A native Unraid dashboard tile showing who is watching what, on which device, and playback progress
- Real-time Progress: Shows current position and total duration (HH:MM:SS / HH:MM:SS format)
- Customizable Appearance: Choose your preferred icon (Plex, Emby, Jellyfin, or generic) and widget title
- Real-time Updates: Configurable polling interval to keep the dashboard current
- Transcoding Indicator: Visual indicator when streams are being transcoded
- Seamless Integration: Follows Unraid 6.12+ design standards (collapsible, movable, and theme-compliant)
- Simple Setup: Dedicated settings page under "User Utilities" for easy configuration
| Dashboard Widget |
|---|
 |
- Log in to your Unraid WebGUI.
- Navigate to the Plugins tab.
- Click on the Install Plugin sub-tab.
- Copy and paste the following URL into the box:
https://raw.githubusercontent.com/gthrift/activestreams-unraid/main/activestreams.plg - Click Install.
After installation, navigate to Settings > Active Streams Settings to configure:
- Widget Title: Choose from "Active Streams", "Video Streams", "Plex Streams", "Emby Streams", or "Jellyfin Streams"
- Widget Icon: Select Plex, Emby, Jellyfin, or a generic film icon
- Refresh Interval: How often to poll servers (1-60 seconds)
- Click Add Server
- Select the server type (Plex, Emby, or Jellyfin)
- Enter a friendly display name
- Enter the server's IP address/hostname and port
- Enter your API token/key:
- Plex: Find your X-Plex-Token in browser developer tools or use this guide
- Emby: Generate in Dashboard > Advanced > API Keys
- Jellyfin: Generate in Dashboard > Advanced > API Keys
- Check "Use HTTPS/SSL" if your server uses SSL
- Click Test Connection to verify settings
- Click Save Server
- Open Plex Web App in your browser
- Open browser Developer Tools (F12)
- Go to Network tab
- Browse to any media item
- Look for requests containing
X-Plex-Token=in the URL - Copy the token value
- Open Emby Dashboard
- Navigate to Advanced > API Keys
- Click the + button to create a new key
- Give it a name (e.g., "Unraid Widget")
- Copy the generated key
- Open Jellyfin Dashboard
- Navigate to Advanced > API Keys
- Click the + button to create a new key
- Give it a name (e.g., "Unraid Widget")
- Copy the generated key
For each active stream, the widget shows:
- Server Indicator: Colored dot indicating which server (orange=Plex, green=Emby, blue=Jellyfin)
- Title: Media name (includes series name for TV shows)
- Device: Client device/app name
- User: Username watching
- Progress: Current position / Total duration (with play/pause icon)
- Transcoding: Exchange icon appears when transcoding
- Verify the server IP and port are correct
- Ensure the API token/key is valid
- Check if the server is running and accessible from Unraid
- If using SSL, verify the certificate or try disabling SSL
- Confirm someone is actively playing media
- Increase the refresh interval if seeing rate limiting
- Check server logs for any API errors
- Ensure you have the latest version installed
MIT License - See LICENSE file for details.
Contributions are welcome! Please feel free to submit issues or pull requests on GitHub.
If you encounter any issues or have feature requests, please open an issue on the GitHub repository.