
-
Building a simple network
1.1. Switch configuration
1.2. Memory management
1.3. Understanding TCP/IP (on going chapter) -
Establishing Internet Connectivity
2.1. Understanding TCP/IP transport layer (on going chapter)
2.2. Exploring the function of routing
2.3. Configuring static routing
2.4. Managing traffic using ACLs
2.5. Establishing INTERNET connection
. Networks are crucial to connect materials in a local or a worldwide area. In order to deploy a network, some notions are required. Therefore, we'll be using Cisco CLI command line as an example (I recomand using cisco's materials or packet tracer).
. Before starting the course, those general CLI commands might be helpful:
(enable) Show the 50 last executed commands:
terminal history size 50
(enable) Show the last commands:
show history
(enable) Number of lines in the current terminal screen:
terminal length 100
(enable) Show only the Y found on X: (example : X running-configuration , Y interface)
show X | include Y
(enable) Show the whole section in X that contains Y (doesn't work on the actual packet tracer):
show X | section Y
. Switches are intelligent devices that connect many machines under the same network. It works on OSI layer 2 (link layer) using mac addresses. It forward, filter or flood (broadcast) frames based on MAC table entries. . A switch have many full duplex ports (generally 24 ports) and allows various port speed.
. We can:
-
Give it a hostname.
-
Give it an ip address and default gateway through VLANs (vlan1 is up by default on all interfaces).
-
Give a password (clear, encrypted or secret) to :
o EXEC user mode.
o EXEC privileged mode.
o Line VTY from 0 to 15 (allows SSH and telnet communication for remote control).
o Line console.
-
Show :
o Device’s properties.
o Interface’s (physical and virtual) properties.
(enable) Display configuration and properties of the device:
show version
(enable) Display fa0/1 configuration:
show interfaces fastethernet 0/1
(config t) Change the switch’s name to name:
hostname name
(config t) Gives the default gateway of a connected router:
ip default-gateway A.B.C.D
(config t) Assign an ip address and a subnet mask for the switch trough vlan:
interface vlan 1
ip address A.B.C.D 255.255.255.0
no shutdown
(config t) Create a user so he can enter the switch (EXEC user mode only):
username user1 password cisc0
(config t) Create a user so he can enter the switch (EXEC privileged mode):
username user1 privilege 15 secret cisc0
(config t) Create a secret secure password for the exec privileged mode:
enable secret cisc0
(config t) Gives a password to the line console 0 (the line from which we can modify directly the switch):
line console 0
password cisc0
login
exit
(config t) Gives a password from vty line 0 to vty line 15 :
line vty 0 15
password cisc0
login
exit
(config t) Crypt all passwords with a weak hash :
service password-encryption
(config-line) It will stop the sessions after 1mnt and 13 seconds. Note if we put 0 0, it will be stopped immediately.
exec-timeout 1 13
. There are 2 types of configuration:
-
Running configuration : o Saved on RAM (not permanent, disappear on reload). o Reflects the current configuration.
-
Startup configuration : o Saved on NVRAM (permanently, reloads after a reboot).
-
If there’s no configuration yet, the device will enter the setup mode or load a blank configuration from the flash memory.
-
The last type of memories is the ROM memory. It stores the bootstrap program that is used to initialize the boot process.
(user) Show the actual config:
Show running-config
(user) Show the after reload config:
Show startup-config
(enable) Save the actual config permanently on the NVRAM:
copy running-config startup-config
(enable) Save the actual config permanently on the TFTP server:
copy running-config tftp
(enable) Write in the NVRAM memory:
write
Or
write memory
(on going chapter)
. Routers are required to reach hosts that are not in the local network. They use routing table to route between networks.
(enable) Display known ip routes:
show ip route
(enable) Show interfaces states:
Show ip interface brief
(enable) Show interfaces details:
Show interfaces
(enable) CDP: Cisco Discovering Neighbors. Show characteristics of directly connected devices:
show cdp neighbors
(enable) same thing with more depth:
show cdp neighbors detail
(config-if) Add a descriptive text to an interface:
interface serial 0/0/0
description Link to isp
. Static routes:
- A network administrator manually enters static routes into the router.
- A network physical changes requires a manual update to the route.
- Routing behavior can be precisely controlled.
- We use static routes when: o It’s a small network. o It’s a hub-and-spoke network topology (star topology). o When you want to create a quick ad-hoc route.
. Dynamic routes:
- Adjusts dynamically routes when the topology or the traffic changes.
- Routers learn and maintain routes to the remote destinations by exchanging routing updates.
- Routers discover new networks by sharing routing table information.
- We use dynamic routes when : o It’s a large network. o The network is expected to scale.
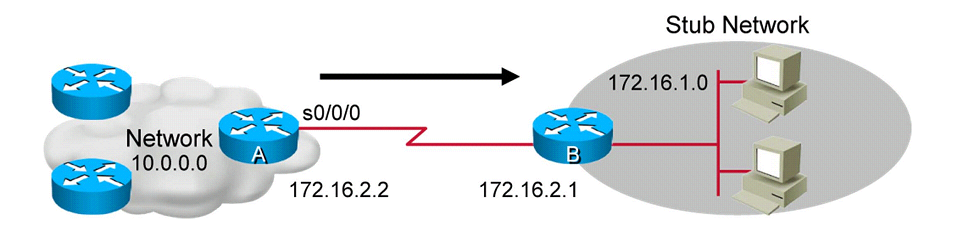
. Static route is unidirectional. Which means, we have to configure it to and from a stub (destination) network to allow communication to occur. . Steps to configure a static route:
- Define a path to an IP destination network (172.16.1.0 255.255.255.0).
- Use the IP address of the next-hop router interface (172.16.2.1). OR (less recommanded), use the outbound interface of the local router (serial 0/0/0).
Note :You have to specify routes to all networks that you have to attend on each router.
- To expand the network outside the local area (eg: internet), We just have to make a default all 0 route (0.0.0.0) that literlly express : all possible routes.
R1 (config) Where we want to go + mask + from where should we enter on R2:
ip route 172.16.1.0 255.255.255.0 172.16.2.1
R1 (config) Gives a default route through the serial port 0/0/1 (concerned router). This method is not recommended:
ip route 0.0.0.0 0.0.0.0 serial 0/0/1
R1 (config) Gives a default route through the next hop router for any address (0.0.0.0 mask 0.0.0.0). Ex: it’s used for internet:
ip route 0.0.0.0 0.0.0.0 172.16.2.1
(config) Show our actual static routes:
show ip route
. ACL are rules (succession of statements) to filter the traffics. It acts like a firewall to the network. They can be applied inbound (going in the router) or outbound (going out the router).
. The wildcard mask is calculated by:
- Putting important bits to 0.
- Putting unimportant bits to 1.
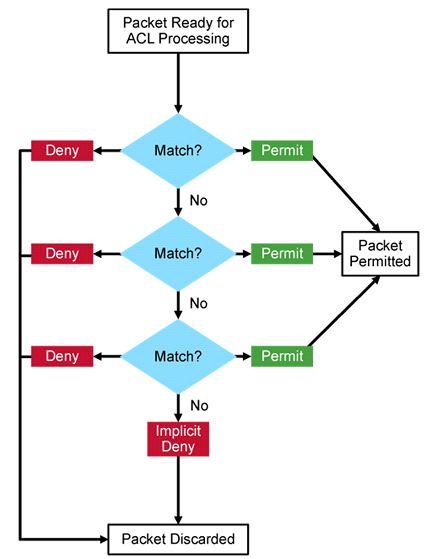
. ACL are read and executed from the 1st to the last statement, so be careful how sorting them! That's being said, there’s always a deny any (implicit deny) at the end of an ACL, which means in other words: every not mentioned permit case will be denied.
. The advantage of named ACL is that you can modify statements order by adding or removing them. By default, the range between every statement is 10.
.Note that Only one ACL per protocol, per direction AND per interface is allowed.
. With standard ACL we can deny source IP addresses from crossing from a router to another.
. Standard ACL goes from “1 to 99”, then from “1300 to 1999”.
. Standard ACL are configured closest to the destination (closest router and closest interface. Which means, mostly outbound). Otherwise, if it is applied closer to the destination, it will block the source from reaching all the networks (not only the selected one).
(enable) show configured access-lists:
show access-lists
(config t) Putting our ACL statements. On the below ACL, all 192.168.2.X addresses are denied (sources addresses):
access-list 1 deny 192.168.2.0 0.0.0.255
(config t) Those two commands are equivalent:
access-list 1 deny 192.168.2.101 0.0.0.0

access-list 1 deny host 192.168.2.101
(config t) Those two commands are equialent:
access-list permit 0.0.0.0 255.255.255.255

access-list 1 permit any
(config-if) Applying the ACL on the interface. Be careful, out means out the ROUTER.
interface fa 0/1
ip access-group 1 out
(config-line) Configuring the interface on a LINE not interface, so don’t confuse "class" with “group”.
line vty 0 4
ip access-class 1 out
(config t) create a named acl OR enter modification mode to the existing named ACL:
ip access-list standard nameACL
(config-std-nacl) We add statements only when we enter the named ACL config mode:
deny 192.168.2.101 0.0.0.0
permit 192.168.2.0 0.0.0.255
(config-std-nacl) Add a statement between existing statements by adding the number of is line:
9 permit host 192.168.2.3
(config-std-nacl) remove the statement number 10:
no 10
(config t) (doesn't work on packet tracer) re attribute the sequence numbers to the statements starting from 10 and incrementing by 20:
ip access-list resequence nameACL 10 20
Example :
It goes from this :

9 deny …
10 permit …
20 permit …

to this:

10 deny …
30 permit …
50 permit …
. With extended ACL we can:
- Deny/permit a protocol from going out the source IP or reaching a destination IP. It also allow (optionally) precising the ports number.
. Extended ACL goes from “100 to 199”, then from “2000 to 2699”.
. Extended ACL are configured closest to the Source, so they are mostly inbound.
Protocols + port number:
IP : Any Internet Protocol.
TCP : Transmission Control Protocol. Connected transport protocol (3 men handshake). Concerned protocols: FTP(21), SSH(22), Telnet(23), http(80), https(443), DNS(53).
UDP : User Datagram Protocol. Disconnected transport protocol (don’t verify the connection and the arrival of the data). Concerned protocols: DNS(53), TFTP(69), SNMP(161).
ICMP : Internet Control Message Protocol.
AHP : Authentication Header Protocol. Part of the IPsec, it provides authentication (known sender) and integrity (whole data).
ESP : Encapsulation Security Payload. (Payload is the data) part of the IPsec, it provides authentication, integrity and confidentiality (encryption).
OSPF : Open Shortest Path First. Is an IGP , its metric is the shortest path with the best transmission debit.
EIGRP: Enhanced Interior Gateway Routing Protocol. Is a Cisco’s IGP.
GRE : Generic Routing Encapsulation. Cisco’s protocol that encapsulate any package from layer 3 in order to secure networks. Example: from a private address encapsulated to a public address. Or from IPv4 to IPv6.
(config t)
Action: deny / permit / remark
Protocols: ahp, eigrp, esp, gre icmp, ip, ospf, tcp, udp.
Source: the concerned by the block.
Destination: the receiver.
Compared-port-number: equal (eq), greater (gr), lower (lw), …
Port number: or protocol name(the port number thing is optional). ex: www or 80:
access-list 100 action protocol source wildcard-source destination wildcard-destination compared-port-number port-number

example
access-list 100 deny tcp 10.10.10.0 0.0.0.255 192.168.1.0 0.0.0.255 eq www
(config t) We can use host instead of writing 0.0.0.0:
access-list 100 deny ip host 10.10.10.200 host 192.168.1.1
(config t) Permit ip from any source to any destination:
access-list 100 permit ip any any
(config t) We permitted only the port 80 (http) which means, we’ll be able to reach the website but we can’t ping the host:
access-list 100 permit tcp 192.168.1.0 0.0.0.255 host 10.10.10.200 eq 80
(config t) Exactly the same thing as standard named ACL:
ip access-list extended nameACL
. When deleting an ACL, you have to delete the interface configuration too. Example:
R0 # show access-lists
R0 (config) # no ip standard access-list 1
R0 (config-if) # no ip access-group 1 out
. By enabling internet connectivity, we’re talking about DHCP and NAT.
. DHCP is a client server model. The client is a host that requests an IP address and configuration from a DHCP server (or a router).
. DHCP IP address allocation mechanisms:
- Automatic allocation: a permanent IP address is assigned to a client.
- Dynamic allocation : A client is assigned an IP address for a limited time (refreshable).
- Manual allocation : A client is assigned an IP address by the network administrator.
. Note if DHCP fails, APIPA (Automatic Private IP Addressing) will get the relay to ensure a local network connexion only. Apipa range from 169.254.0.1 to 169.254.255.254.
(config t) First of all, configure the concerned interface to be the default route:
interface gig 0/0/0
ip add 192.168.1.254
no sh
Now we shall begin.
(config t) Enable dhcp on the router:
service dhcp
(config t) creates a pool of addresses named namepool:
ip dhcp pool namepool
(dhcp-config) the pool of addresses will be between 192.168.1.1 to .254:
network 192.168.1.0 255.255.255.0
(dhcp-config) default gateway that should be set on pcs:
default-router 192.168.1.254
(dhcp-config) giving the address of the DNS server (optional):
dns-server 192.168.1.1
(dhcp-config) giving the domain name (optional):
domain-name doth.com
(dhcp-config) Days, Hours, Minutes. Lease time is how long the address will remain the same before it gets refreshed.
lease 9 0 0
(config t) Exclude DNS and gateway addresses from the pool:
ip dhcp exclude-address 192.168.1.254
ip dhcp exclude-address 192.168.1.1
(enable) Shows connected DHCP devices to the router:
show ip dhcp binding
(enable) Verify information about configured DHCP address pools:
show ip dhcp pool
(enable) Display the address conflicts that are found by a DHCP server:
show ip dhcp conflict
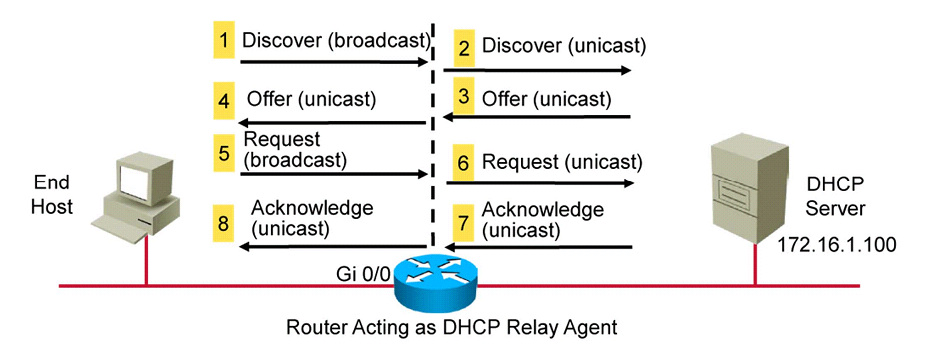
(config-if) We’ll just have to tell the router where he should get the information after enabling DHCP on the server:
ip helper-address 172.16.1.100
. Back then in 1980, when internet was made, IPv4 counted 4 billion possible addresses. They thought it would be sufficient but sooner they understood they were wrong. In order to fix that and have more time to figure out a new solution, (which is now IPv6), they made private addresses that can be used over and over again in local networks (They’re NOT allowed in public internet).
Private addresses:
- From 10.0.0.0 to 10.255.255.255
- From 127.16.0.0 to 172.31.255.255
- From 192.168.0.0 to 192.168.255.255
. We also distinguish 3 types of NAT addresses: - Inside local : The host private address inside the network.
- Inside global : Assigned by an ISP, it’s the address that allows the customer outside access (internet).
- Outside global: websites, services… Any other hosts outside the network.
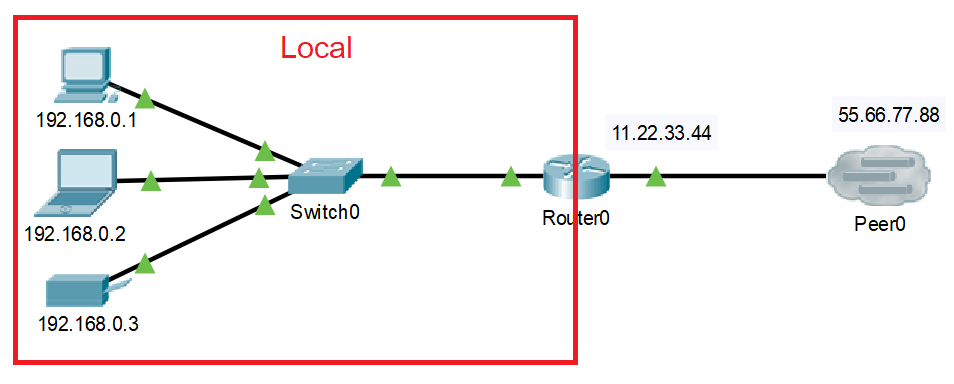
. But in order to use them over and over again, they needed NAT to translate 1 public address to multiple private addresses (as shown in the following photo):
. Now we're going to see each type of NAT and how to configure them.
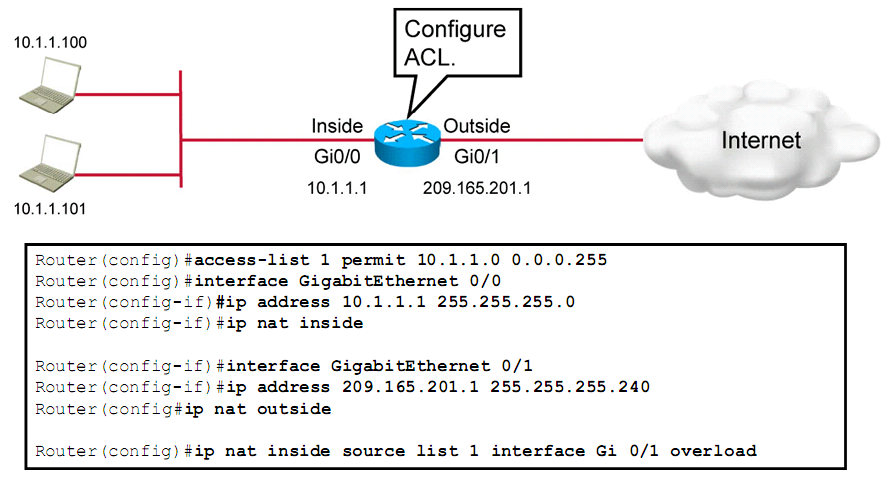
. The most popular NAT is PAT, a many to one address mapping. It converts a private address + port number to a public address + port number. This is actually what ISP uses to provide us internet connexion to our houses.
. Let’s explain PAT with an example:
Phase 1: sending from local to public (a website since it’s port 80):
-
Source (Inside local) : 192.168.0.1:8897 destination(Outside global): 55.66.77.88:80
-
Source (Inside global): 11.22.33.44:8897 destination(Outside global): 55.66.77.88:80
-
Router NAT table :
| Inside | Outside |
| 192.168.0.1:8897 | 11.22.33.44:8897 |
Phase 2: response from the website:
- Source (Outside global): 55.66.77.88:80 destination(inside global): 11.22.33.44:8897
- Since the router has a match in its NAT table, the data will continue its way.
- Source (Outside global): 55.66.77.88:80 destination(inside local): 192.168.0.1:8897
- Since it’s working with port number, we’ll not only know which host need the data but also which application will use it.
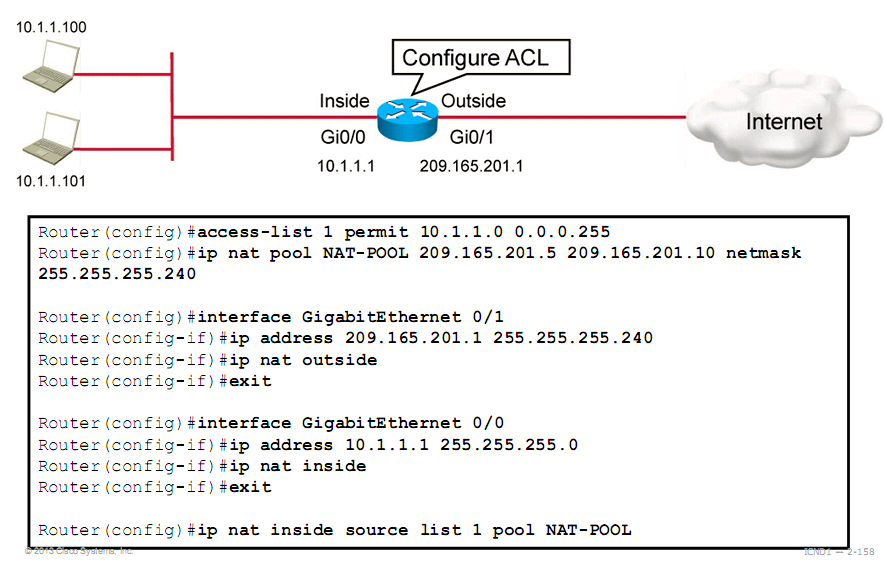
. It’s a many to many address mapping, The way Dynamic NAT works is by assigning each private IP to a public IP from a manually created pool of available public addresses, which means, buy each address separately from the ISP.
. You can use this to merge two networks with the same subnet together (as they are 1 subnet for example). In other words, you would configure the connecting routers to make the subnets appear to be different to what they actually are.
. Let’s explain it with the same example:

. Phase 1: sending from local to public (a website since it’s port 80):
- Source (Inside local) : 192.168.0.1:8897 destination (Outside global): 55.66.77.88:80
- Source (Inside global): 11.22.33.52:8897 destination (Outside global): 55.66.77.88:80. The router swap the inside local with the first available outside local address from the pool.
- Router NAT table :
| Inside | Outside |
| 192.168.0.1 | 11.22.33.52 |
Phase 2: response from the website:
- Source (Outside global): 55.66.77.88:80 destination (inside global): 11.22.33.52:8897
- Since the router has a match in its NAT table, the data will continue its way.
- Source (Outside global): 55.66.77.88:80 destination (inside local): 192.168.0.1:8897
- After it's done, the public address (outside global 11.22.33.52) will return to the NAT pool of addresses, ready to be used again.
. Static NAT is a one to one mapping addresses. It means you manually assign each private IP address + port number to a public IP address + port number. Pretty useful when running web server or mail server for example.
. Ye ye, same example again:
. Phase 1: sending from local to public (a website since it’s port 80):
- Router NAT table :
| Inside | Outside |
| 192.168.0.1:8897 | 11.22.33.44:80 |
- Source (Inside local) : 192.168.0.1:8897 destination (Outside global): 55.66.77.88:80
- Source (Inside global): 11.22.33.44:8897 destination (Outside global): 55.66.77.88:80. It swaps directly if it finds a match at the destination.
. Phase 2: response from the website:
- Source (Outside global): 55.66.77.88:80 destination (inside global): 11.22.33.52:8897
- Since the router has a match in its NAT table, the data will continue its way.
- Source (Outside global): 55.66.77.88:80 destination (inside local): 192.168.0.1:8897
(enable) verify if addressing is ok.
show ip nat translations
(enable) Show the translations that already happened.
show ip nat statistics
(enable) Display detailed dynamic data and events.
debug ip nat
ALWAYS turn off the debug once you’re done because it consumes a lot of resources.
no debug all

or

undebug all
(enable) In case it isn’t working, verify your addressing and ACL.
show access-list
show ip route
. This is an introduction to networking main concepts. We'll approach more advanced concepts (as port security, OSPF, Vlans, ...) on the next topics.
. I wrote this summary in a simplistic way from what I've read on the official cisco documentation (100-105 and 200-105) additioannly to other courses, books and videos.
. I highly recommand reading official Cisco documentation and do additional labs if you're preparing for the certification.
. Please do not hesitate asking your questions. Hope it will be any helpful :).
more is to come :D !