3. Advanced Section
Server Authentication is another option, which allow you to authenticate using Json Web Token (JWT). Json web token contains your app account details which typically consists of a single string which contains information of two parts, Jose header and JWT claims set.
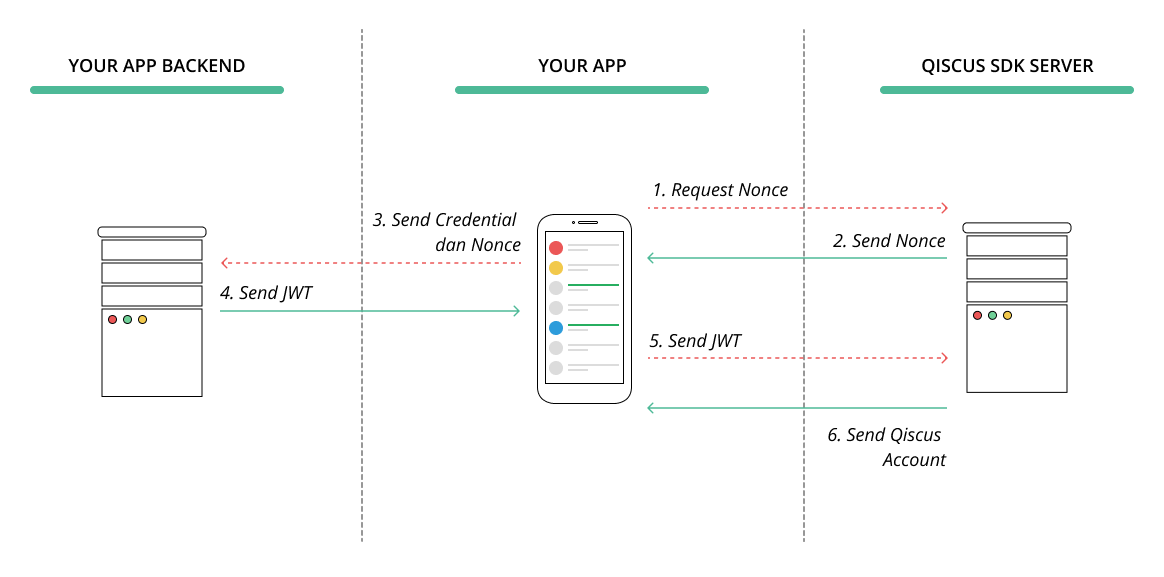
The steps to authenticate with JWT goes like this:
- The Client App request a nonce from Qiscus SDK server
- Qiscus SDK Server will send Nonce to client app
- Client App send user credentials and Nonce that is obtained from Qiscus SDK Server to Client app backend
- The Client App backend will send the token to client app
- The Client App send that token to Qiscus Chat SDK
- Qiscus Chat SDK send Qiscus Account to Client app
You need to request Nonce from Qiscus Chat SDK Server. Nonce (Number Used Once) is a unique, randomly generated string used to identify a single request. Please be noted that a Nonce will expire in 10 minutes. So you need to implement your code to request JWT from your backend right after you got the returned Nonce. Here is how to authenticate to Qiscus Chat SDK using JWT :
QiscusRxExecutor.execute(QiscusApi.getInstance().requestNonce(), new QiscusRxExecutor.Listener<QiscusNonce>() {
        @Override
        public void onSuccess(QiscusNonce qiscusNonce) {
            //do request jwt from your backend using returned Nonce
        }

        @Override
        public void onError(Throwable throwable) {
            //do anything if error occurred
        }
    });
The code above is a sample of method you can implement in your app. By calling QiscusRxExecutor.execute(QiscusApi.getInstance().requestNonce() , you will request Nonce from Qiscus SDK server and a Nonce will be returned. If it is success, you can request JWT from your backend by sending Nonce you got from Qiscus SDK Server.
When you got the JWT Token, you can pass that JWTto Qiscus.setUser() method to allow Qiscus to authenticate your user and return user account, as shown in the code below :
Qiscus.setUser('your jwt token', new Qiscus.SetUserListener() {
        @Override
        public void onSuccess(QiscusAccount qiscusAccount) {
            //do anything if success
        }

        @Override
        public void onError(Throwable throwable) {
            //do anything if error occurs
        }
});When your backend returns a JWT after receiving Nonce from your client app, the JWT will be caught by client app and will be forwarded to Qiscus Chat SDK Server. In this phase, Qiscus Chat SDK Server will verify the JWT before returning Qiscus Account for your user. To allow Qiscus Chat SDK Server successfully recognize the JWT, you need to setup Jose Header and JWT claim set in your backend as follow :
Jose Header :
{
  "alg": "HS256",  // must be HMAC algorithm
  "typ": "JWT", // must be JWT
  "ver": "v2" // must be v2
}
JWT Claim Set :
{
  "iss": "QISCUS SDK APP ID", // your qiscus app id, can obtained from dashboard
  "iat": 1502985644, // current timestamp in unix
  "exp": 1502985704, // An arbitrary time in the future when this token should expire. In epoch/unix time. We encourage you to limit 2 minutes
  "nbf": 1502985644, // current timestamp in unix
  "nce": "nonce", // nonce string as mentioned above
  "prn": "YOUR APP USER ID", // your user identity such as email or id, should be unique and stable
  "name": "displayname", // optional, string for user display name
  "avatar_url": "" // optional, string url of user avatar
}
Qiscus Chat SDK enable you to customize Chat UI as you like. You can modify colors, change bubble chat design, modify Chat Header, and many more. There are 2 level of UI customization, Basic and Advance Customization. For Basic Customization, you can simply look at the autocomplete suggestion in your IDE to see lots of method to modify your Chat Interface. For Advance Customization, you need to download the UI source code and modify anything as you need.
Basic customization allows you to modify things inside Qiscus Chat SDK features. To do that, you can simply look at the autocomplete suggestion under getChatConfig() in your IDE to see lots of method to modify your Chat Interface. You can change almost everything inside your chat room such as bubble chat, header chat, read receipt, and many more. Here is the example of modifying status bar color, app bar color, title buble chat color and date format.
Qiscus.getChatConfig()
      .setStatusBarColor(R.color.blue)
      .setAppBarColor(R.color.red)
      .setTitleColor(R.color.white)
      .setLeftBubbleColor(R.color.green)
      .setRightBubbleColor(R.color.yellow)
      .setRightBubbleTextColor(R.color.white)
      .setRightBubbleTimeColor(R.color.grey)
.setTimeFormat(date -> new SimpleDateFormat("HH:mm").format(date));For advance customization, you can modify everything on the chat interface by forking our repository or just right away modifying our CustomChatActivity.java based on your needs.
An Event Handler is a callback routine that operates asynchronously and handles inputs received into a program. Event Handlers are important in Qiscus because it allows a client to react to any events happening in Qiscus Chat SDK. For example, if a client wants to know any important events from server, such as success login event, client's app can be notified by calling a specific Event Handler. Client, then, can do things with data returned by the event. To enable client app to publish or subscribe something to Qiscus Chat SDK, we use EventBus library , so you can listen event from anywhere. You can learn more about Eventbus here.
Here is an example to use Eventbus on your application class :
public class SampleApps extends Application {
    @Override
    public void onCreate() {
        super.onCreate();
        Qiscus.init(this, "APP_ID");

        EventBus.getDefault().register(this);
    }

    /**
     * Subscribe anywhere to listen new message if you just got new message from someone
     */
     @Subscribe
     public void onGetNewQiscusComment(QiscusCommentReceivedEvent event) {
        QiscusComment qiscusComment = event.getQiscusComment();
        // Do your implementation
    }

    /**
     * Call QiscusPusherApi.getInstance().listenRoom(qiscusChatRoom); to get room event from anywhere at your application
     */
     @Subscribe
     public void onGetNewQiscusRoomEvent(QiscusChatRoomEvent event) {
        switch (event.getEvent()) {
            case TYPING:
                //Someone is typing on this room event.getRoomId()
                break;
            case DELIVERED:
                //Someone just received your message event.getCommentId()
                break;
            case READ:
                //Someone just read your message event.getCommentId()
                break;
        }
    }

    /**
     * Call QiscusPusherApi.getInstance().listenUserStatus("[email protected]"); to listen status of [email protected]
     */
     @Subscribe
     public void onUserStatusUpdated(QiscusUserStatusEvent event) {
        // A user just changed his/her status from (online or offline)
        // event.getUser() changed to event.isOnline() at event.getLastActive()
    }
}ProGuard is the most popular optimizer for Java bytecode. It makes your Java and Android applications smaller and faster. Read here for more detail about Proguard. If you are using Proguard in your application, make sure you add Proguard rules of Qiscus from Qiscus Proguard Rules to your Proguard rules.
For you who prefer to code with RXJava, Qiscus Chat SDK does support RXJava. So, you can do anything as you do with Native Java. For example, to set a user, as has been explained in Basic Authentication section, you can do the same with RXJava. Here an example of how you can set user with it:
// Setup qiscus account with rxjava example
Qiscus.setUser("[email protected]", "password")
      .withUsername("Tony Stark")
      .withAvatarUrl("http://avatar.url.com/handsome.jpg")
      .save()
      .subscribeOn(Schedulers.io())
      .observeOn(AndroidSchedulers.mainThread())
      .subscribe(qiscusAccount -> {
          //do anything if success
      }, throwable -> {
          //do anything if error occurs
      });