Jupyter notebook Tutorial
The r2d2 server has ipython and Jupyter installed (and now also an R kernel for Jupyter). But the installation procedure is also presented here (at the end). You don't need to install your ipython or Jupyter environment on r2d2.
For first time user, here is the brief procedures:
-
Use PuTTY (normal session) to login r2d2
- Enter into Python virtual environment
- Set jupyter configuration and password
- Start jupyter notebook
These operations are all executed in the remote server r2d2. And after these, jupyter notebook will keep running after you close the PuTTY session.
-
Use PuTTY (with Tunnel settings) to login r2d2, while nearly do nothing in r2d2
- Open browser in local computer and use http://localhost:8888 (replace 8888 by your port number)
Before starting jupyter notebook, set a password first then you don't need to copy the token every time you login.
[r2d2]$ source /home/aardvark/tools/VENV/PY3_VENV/bin/activate
(PY3_VENV) [r2d2]$ jupyter notebook --generate-config
This command will create a folder of jupyter configurations in you user folder: /home/USERNAME/.jupyter.
(PY3_VENV) [r2d2]$ jupyter notebook password
Enter password:  ****
Verify password: ****
[NotebookPasswordApp] Wrote hashed password to /home/USERNAME/.jupyter/jupyter_notebook_config.json
More details are in set jupyter password.
To use Jupyter notebook on the remote server, first start Jupyter notebook service on that server. That will work for either Python2, Python3 and R notebooks.
First we have to activate the python virtual environment and then start Jupyter notebook service without opening browser and specify a port number. Since the default port number of Jupyter notebook is 8888, we use some number other than 8888 here. If someone else is using a port, using that port would give you access to their user.
Adding a & character after the shell command lets you continue to use the shell. You can also use screen command or other ways to start jupyter notebook. After starting it, you can log out the server.
[r2d2]$ source /home/aardvark/tools/VENV/PY3_VENV/bin/activate
(PY3_VENV) [r2d2]$ jupyter notebook --no-browser --port=8889 &
[1] 38636
Note:
The number of the port that you write in the shell is the port for the server. For starting jupyter, remember to use normal session of Putty to login r2d2, not to use the tunnel settings (by which you connect to jupyter on r2d2 in you local computer) to login r2d2. In Putty's normal session, you can start jupyter notebook and let it run in background after you close the Putty session. By doing this, after you close the session, jupyter notebook is still running on r2d2. Next time you only need to connect you local computer to the remote jupyter on r2d2. You don't need to start jupyter again.
Another note for Putty on Windows:
If you start jupyter by Putty on Windows, after starting, deactivate it and use
exitcommand to exit Putty. Then jupyter will continue running on the background. And you don't need to start jupyter every time you want to use it.
If you have linux in your local computer, then in your local computer, use ssh command to connect the Jupyter notebook service of the remote server.
- -N tells ssh we won’t be running any remote processes using the connection.
- -f runs ssh in the background, so we don’t need to keep a terminal session running just for the tunnel.
- -L specifies that we’ll be forwarding a local port to a remote address and port. In this case, we’re forwarding port 8888 on our machine to port 8889 on the remote server.
Here we use the default port number on local computer, which means at the same time you can not use the Jupyter notebook on your local computer if it also uses default port number. If you want to use local and remote Jupyter notebook at the same time, just choose another port number.
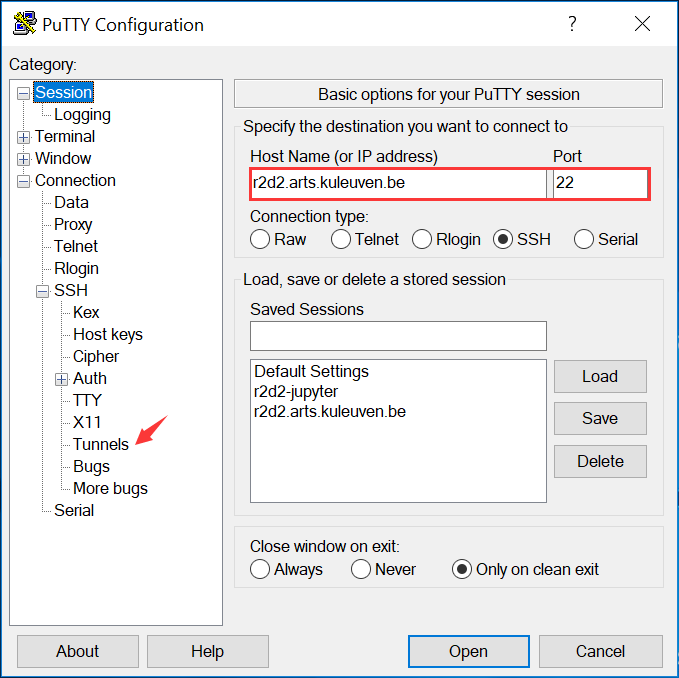
[local]$ ssh -N -f -L 8888:localhost:8889 tao@r2d2.arts.kuleuven.beIf you have Windows in your local computer, open PuTTY and write the server name [user@]r2d2.arts.kuleuven.be as Host Name, then in the left panel of the PuTTY configuration window, go to Connection>SSH>Tunnels.
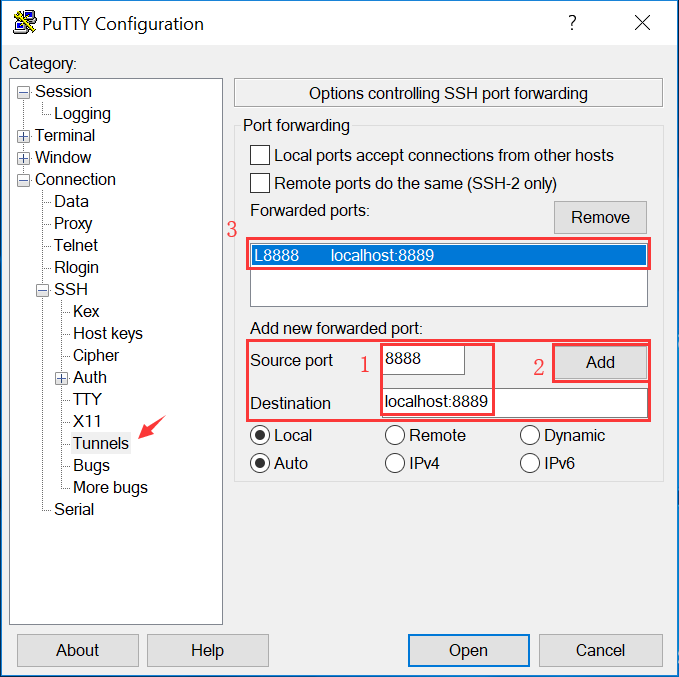
Select a source port (like 8888, unless you're using Jupyter notebook locally too) and a destination (localhost:8889). The number after localhost must be the number of the port you assign to the remote server. Add it and you will see it in Forwarded ports.
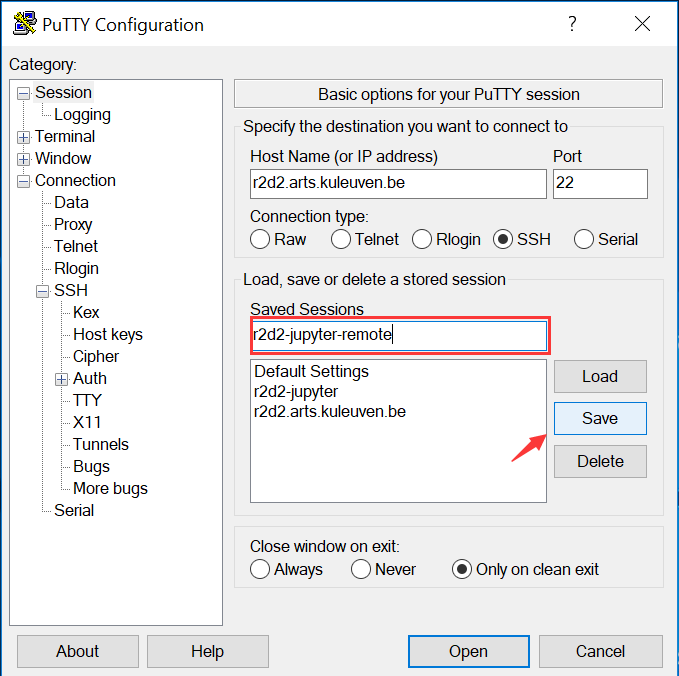
Go back to the Session, and you can save your session with a session name. Then it will be added into your session list. Next time you can click the specific session, and open it.
Since we have to do this before actually signing to the server, try to make sure the port is free. If it's not, jupyter will assign you a new port but you won't be connected to it so you won't have access. In any case, once in the server command line, you can run
ps -ef | grep jupyterto check who is using jupyter and on which port. You can kill previous sessions of yours withkill #processnumber.
You can open your browser and use address localhost:8888 (or whatever port you assigned to your computer) to Jupyter notebook on remote server. But before that, since Jupyter protects remote sessions by token and password, we have to enter the password for any Jupyter session on r2d2, which is passwd4jupyter.
Mariana says: The only time that password worked for me, I entered Tao's session. In the console, once you run the jupyter notebook, you will get messages with the token number. You can copy and paste that. In many cases you don't need that at all.
You may periodically get a message saying the file has changed from disk, do you want to overwrite or reload. If you want to block this annoying message, use %autosave 0 command in your ipython code.
%autosave 0
Then there would still be an error when you are trying to save the file, saying get a message Unexpected error while saving file: snippets.ipynb 'module' object has no attribute 'fsync'. But this seems not affect saving your file. So we just ignore it.
You should be able to install packages in your personal user and access them from your R notebooks. We've managed to do that at least from the console (not from the notebook), by choosing a French repository (Paris 1).
In any Python environment (e.g. Python virtual environment in r2d2), use the pip command to install dependent packages. Then you can use command ipython to enter interaction environment of ipython. The usage of ipython console is similar as Python console.
$ pip install ipython urllib3 jupyter
...
$ ipython
Python 2.7.14 (default, Feb 12 2018, 15:26:26)
Type "copyright", "credits" or "license" for more information.

IPython 5.5.0 -- An enhanced Interactive Python.
?         -> Introduction and overview of IPython's features.
%quickref -> Quick reference.
help      -> Python's own help system.
object?   -> Details about 'object', use 'object??' for extra details.

In [1]:
Use comman jupyter notebook will start Jupyter notebook service. It will automatically open your default browser unless you use --no-browser option. The new opened Jupyter web page has the address localhost:8888 with the default port 8888 of Jupyter. The page will show the directory where you start Jupyter notebook service. And you can select an ipython file and the browser will open it in a new page.
$ jupyter notebook
[I 11:30:01.911 NotebookApp] Serving notebooks from local directory: /home/enzocxt/Projects/QLVL/typetoken_workdir/typetokenQLVL
[I 11:30:01.911 NotebookApp] 0 active kernels
[I 11:30:01.911 NotebookApp] The Jupyter Notebook is running at:
[I 11:30:01.911 NotebookApp] http://localhost:8888/
[I 11:30:01.911 NotebookApp] Use Control-C to stop this server and shut down all kernels (twice to skip confirmation).
[I 11:30:02.148 NotebookApp] 302 GET /tree (127.0.0.1) 6.58ms