First Run Guide

Are you interested in creating your own instance of LogUI server for your experiments and other interaction logging tasks? Great, we're thrilled that you are! This page will present to you everything you need to know to get an instance of LogUI server up and running.
We've split this guide into two main parts — one for the quickfire list of commands you need to enter, and the other for a more detailed explanation if things don't work properly the first time.
Note that where you are required to issue a command to a terminal/Command Prompt instance, we precede the command with a dollar sign (
$). You're not required to enter this; this is a standard symbol to denote that a terminal command is following. If you were asked to run$ cd scripts, you'd entercd scripts.
If you're running Windows, you'll need to use Windows PowerShell to create the
.envfile. This can be run from a standard Command Prompt with thepowershellcommand. For example, to run the scriptcreate_env.ps1, issue the following command.
powershell -ExecutionPolicy Bypass -File create_env.ps1
-ExecutionPolicy Bypassensures that the script can run. Your system by default is not permitted to run PowerShell scripts for security reasons.The
create_userscript for Windows is a simple batch file, so doesn't require any special treatment. Just typecreate_user.batinto a Command Prompt when you need it.
Try the following commands to get a copy of LogUI server up and running. Each of these numbers correlates to a step in the detailed explanations section. If something doesn't work, then refer to the detailed explanation for that step to see if you can solve it.
-
Install Prerequisites
- Install Docker (tested with version
19.03). - Install
docker-compose(version1.18.0or greater, supporting compile file version3.0). Using Docker on macOS or Windows?docker-composewill already be installed. - Install
git.
- Install Docker (tested with version
-
Open a terminal/Command Prompt, and clone the LogUI server repository.
$ git clone https://github.com/logui-framework/server logui-server -
Use the
create_envscript to create an.envfile.$ cd logui-server/scripts/$ ./create_env.sh$ cd ..Use
create_env.ps1if you are running Windows. You can edit the.envfile created in the root repository to tweak settings about your deployment. Check out this page for more information. -
Build the LogUI server container images, and pull pre-built images from the Docker repository.
$ docker-compose -p logui build$ docker-compose -p logui pullThis will take about 5-10 minutes, and download around 400MB of data.
-
Start the LogUI server containers.
$ docker-compose -p logui upThis will take about 20-30 seconds to complete.
-
In another terminal/Command Prompt window, create a user account to login with.
$ cd scripts$ ./create_user.sh davidReplace
davidwith the username of the account you want to create. For Windows, run the scriptcreate_user.batinstead. -
Navigate to
http://localhost:8000in your browser. Replace8000with the port you are using (specified in your.envfile), or replace the hostname where necessary. -
When you want to stop LogUI server, find the terminal with Docker running.
-
Use CTRL+C to stop the containers.
-
Issue
$ docker-compose -p logui down
These commands will not remove your data from the database volumes, nor will it remove any built images.
-
If you want to run LogUI server without being attached to a terminal/Command Prompt, substitute step 5 with the following.
$ docker-compose -p logui up -d
You can stop the Docker containers in the usual way with the following command.
$ docker-compose -p logui down
If you encounter an issue, you can read through the detailed notes for each of the commands listed above.
One of the most important motivations behind designing LogUI server the way we did is portability. Setting up your environment by installing all kinds of software can be a nightmare, so by developing LogUI server in a containerised environment, we have taken 99% of the hassle of setting up out of the equation for you. You can thank us later.
As we're using a containerised architecture, you'll need to make sure that you have Docker installed on the computer you're going to host LogUI server on. You'll also need to make sure you have a TCP port exposed on that computer to your private network (if you are running things internally at your institution) or to the wider Internet if you are going to be crowdsourcing participants, for example. Ideally, you'll have TCP port 80 free (we haven't implemented HTTPS/WSS functionality yet) — but any port will do.
We developed LogUI server using version 19.03 of Docker. This version or greater should work fine; any version of Docker below 19.03 may not have all the required functionality. These have not been tested by us; use any older version of Docker at your own risk and expect issues. If you don't have Docker, you can follow the instructions on the Docker website to download and install it for your platform.
In addition to Docker, you'll also need docker-compose. docker-compose is a helper that deals with the orchestration and management of the containers that LogUI server is comprised of. Instead of you having to create a proxy container and worker container, docker-compose handles all of this for you in one go. If you have Docker Desktop for Windows or macOS, you'll already have docker-compose installed. On a Linux distribution, you may need to install it separately — again, look at the Docker website for instructions on how to do this. We require that you have at least version 1.18.0 of docker-compose installed; any version that supports a compile file of version 3.0 should work fine.
You'll also require git to be installed on your system to clone the LogUI server repository, unless you download the code directly from the GitHub website.
To summarise, make sure you have the following software installed.
- Docker, at least version
19.03. -
docker-compose, at least version1.18.0. - Git (if cloning the repository).
Once you've confirmed that everything is installed, you can download the code for LogUI server. Find somewhere on your filesystem where you'd like the code to live, and then use git to clone the repository.
$ git clone https://github.com/logui-framework/server
This creates a server directory with the LogUI server code. If you want something a bit more descriptive for a directory name, try the following git clone command instead.
$ git clone https://github.com/logui-framework/server logui-server
This clones the LogUI server code into a logui-server directory. It doesn't matter what name you provide for this directory.
Alternatively, if you don't want to use git, then just go to GitHub and download the code at https://github.com/logui-framework/server/. Click the Code button, and then the Download ZIP link. Extract the ZIP file and place the server-main directory wherever you want it to live. Of course, you can also rename this directory to something more descriptive if you like.
Wherever you store the LogUI server code, we'll refer to this as the root directory from now on. For the avoidance of doubt, this is the directory with the empty LOGUI-ROOT file in it.
Once you have a copy of LogUI server on your computer, you'll need to open a terminal/Command Prompt and change into the scripts directory, which lives in the root directory.
$ cd scripts
There's several scripts in this directory to make setting up LogUI server easy. The first script we'll need to run is the create_env script. This creates a .env file in the root directory, containing several variables that are used by Docker when instantiating LogUI server.
We ask you to read the Environment Configuration Wiki page carefully to understand what variables should be present within this file.
To run the create_env script, issue the following command from your terminal.
$ ./create_env.sh
If you are using the Windows Command Prompt, run the following PowerShell script instead.
$ create_env.ps1
Both have the same effect — they create the .env file in the root directory with basic configuration options. Once this file has been created, we ask you to open the newly created file and check (and change where necessary) any values where required. Note that on macOS or Linux, you may not be able to see this file by default in your Finder or file explorer. In the terminal, try the following commands from the root directory (i.e., $ cd .. back up one level first).
$ nano .env
This will open the nano text editor with the file.
Again, we ask you to read the Environment Configuration Wiki page carefully to understand what variables should be present within this file.
Note that the create_env script should only be used when setting up LogUI server. Once you have started LogUI server at least once, do not change the SECRET_KEY variable's value. If you do this, you'll break the encryption functionality for LogUI server. Any applications set up to be tracked with your server instance will then fail authentication, and you won't be able to login. The SECRET_KEY is used to encrypt the authorisation tokens! You can however change the port number (PROXY_LISTEN_ON) at a later date after first setup.
Good! You have the LogUI server code on your computer, and a complete .env file that Docker will use to set everything up for you. Now it's time to build the LogUI server Docker images, as well as pull pre-made images from the Docker registry (for the databases and proxy server that LogUI server uses).
From the root directory, you should issue the following command.
$ docker-compose -p logui build
This will instruct docker-compose to liaise with Docker and build all of the required images for LogUI server to function. Depending on the specifications of your computer, this process should take somewhere between 5 and 10 minutes to complete.
Once you are presented with the prompt once more, you should then issue a pull command to pull prebuilt images from the Docker registry. These are simple prebuilt images of specific applications that LogUI server uses. Issue the following command, again from the root directory.
$ docker-compose -p logui pull
This should take a little less time than the first command, but the duration will vary massively depending on the speed of your Internet connection. In all, both commands will download approximately 400MB of Docker images to your disk. This is the price we pay for ensuring portability!
Note that for these examples, we use the
-p loguiswitch on alldocker-composecommands. This is to ensure that there are no conflicts with any other Docker images on your installation (if any reside).docker-composewould otherwise default to the name of the directory (which by default would beserver, a pretty nondescript name). By appending-p, we prepend all containers withlogui, so you can be sure what containers belong to LogUI server. We assume in subsequent scripts that you use this-p loguiswitch.
Once the building and pulling of Docker images has been completed, you are then ready to start the LogUI server Docker containers! To do this, you once again should use the docker-compose command from the root directory. Always run docker-compose from the root directory.
$ docker-compose -p logui up
This will start the LogUI server images. This process should take about 20-30 seconds to complete, depending on your computer's performance. There will be a lot of output to your terminal/Command Prompt as databases are initialised and files are copied. At this point, the LogUI server HTTP worker will also compile the LogUI server control application. Once this process has completed, you will see the following message. It may be hard to spot, but it should be there! An example of the message to watch out for is shown below.
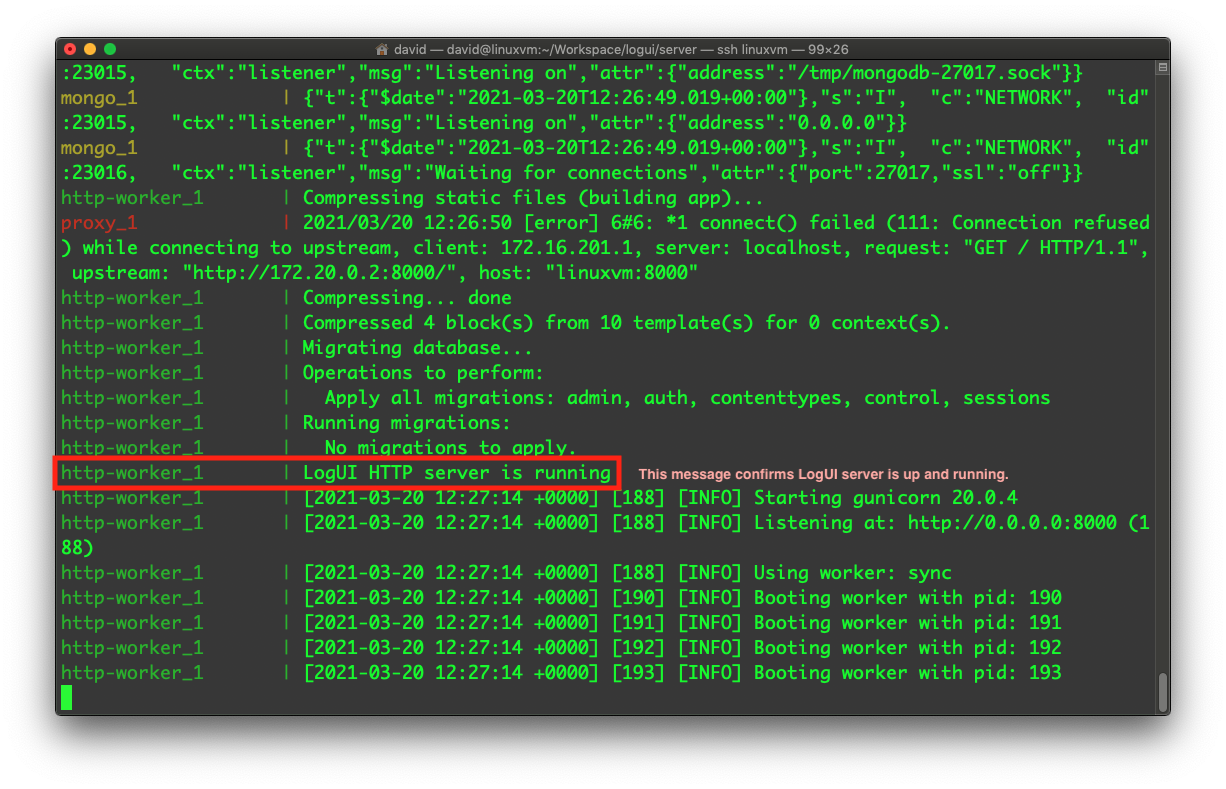
This will come from the container http-worker_1, which is responsible for serving the LogUI server control application. Once you see this message, navigate to the address where you have configured LogUI to run (e.g., http://localhost:8000) in your favourite browser. If you see the LogUI control application's landing screen, you are almost there!
Running Containers Unattached You can also run LogUI server using containers that are unattached to a terminal/Command Prompt (i.e., running them in the background). Append the -d switch on the up command as follows if you wish to do this.
$ docker-compose -p logui up -d
In order to be able to use the LogUI server control application, you need to create a user account. While it is not yet possible to do this via the control application, we have provided a script that will allow you to create a user account. Note, that this step requires the logui server to be running.
To create a user account, you should open a new terminal/Command Prompt instance, and navigate to the scripts directory ($ cd scripts) within the root directory. You need a new terminal/Command Prompt instance because the original instance is now running LogUI server. In a terminal instance, run the following command.
$ ./create_user.sh david
If you are using PowerShell in Windows, run this instead.
$ create_user.ps1 david
Intuition would tell you that the argument david can be replaced with whatever username you are wanting for the new account. This is indeed the case. If you want your account to be claudia instead, you would issue the following command instead to your terminal.
$ ./create_user.sh claudia
You'll then be prompted to provide an e-mail address. This is not required, but you can enter one if you like. Press ENTER once complete. You then should provide a password. Enter something memorable, and then press ENTER. You then will be prompted to re-enter it for verification purposes. Press ENTER once more when complete. If your password is a common one (e.g., password), you'll be asked if you really want to use it. Press y to confirm; n to cancel and try a different password.
When the account has been created successfully, you will see the message Superuser created successfully. This script is a temporary means for you to create a user account. In the future, this will be handled entirely within the LogUI server control app interface.
LogUI takes security seriously. Passwords are salted; the encryption process uses the SECRET_KEY in the .env file to work out the salt. This is one of the reasons why it is so important that you do not change this key after you perform the initial setup!
If all is successful, you'll receive a confirmation message stating that the account has been created.
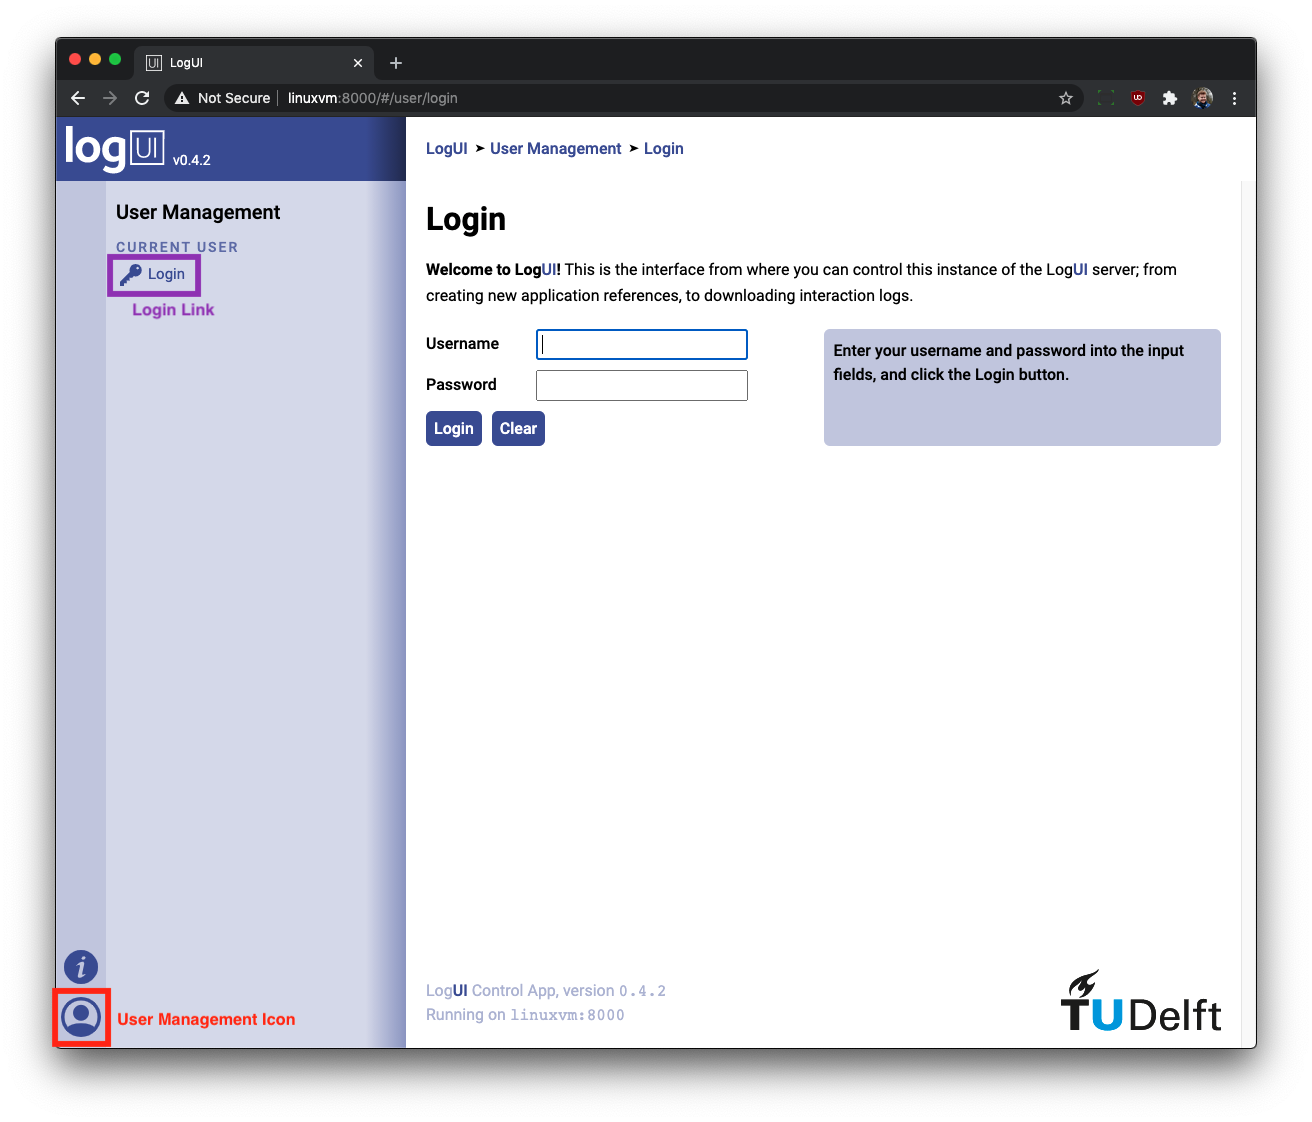
With a user account now created, you can go back to the browser and Login to the LogUI server control application. Using the navigation bar on the left hand side, locate the User Management icon at the bottom (highlighted in red in the screenshot below). Then click the Login link on the submenu (highlighted in purple). The login form will then appear, allowing you to enter your username and password.
Once you are logged in, you can then start using the LogUI server control application. Documentation for the basics on how to use the control application can be found on this wiki page.
When the time comes for you to stop the LogUI server, you should use the docker-compose to do so; again, this command should be issued from the root directory.
In the terminal/Command Prompt where Docker is running, use the keyboard combination CTRL+ C to gracefully stop the containers. This command will not remove your data from the database volumes, nor will it remove any built images. Shutting down may take about 5-10 seconds to complete; the HTTP worker has some tasks to do to ensure a smooth shutdown occurs. This is normal behaviour.
After this has been completed, you should then issue the following command.
$ docker-compose -p logui down
This removes the containers from Docker. Again, this command will not remove your data from the database volumes, nor will it remove any built images. Rather, it is a housekeeping command to keep your system in working order.
When you want to bring LogUI server back online at a later time, all you are required to do is issue the following command, again from the root directory. This is the exact same command issued in step 5.
$ docker-compose -p logui up
This guide should provide you with everything you need to get the LogUI server up and running. If you encounter problems and unexpected errors during this process and you don't know how to solve, them, report an issue and we'll try to get back to you as quickly as possible.
If there's a new version of LogUI server that you wish to deploy, you can try out the following commands. Ensure that your instance of LogUI server has been stopped before trying out these commands. These commands should all be run from the root directory of the LogUI server (the repository root).
$ docker-compose -p logui down
$ git pull
$ docker-compose -p logui build
$ docker-compose -p logui up
Note that for the second command, you will have to redownload the repository if you downloaded a ZIP file. Using git removes this problem in its entirety.
These commands also work for minor updates to LogUI server. For more important updates (for example, an update that alters the structure of the Docker volumes, or even replaces one of the containers), further commands will be required ‐ these will be provided with the release in question.